Das Fensterelement Canvas ist eine Art Zeichenfläche, die Sie als Programmierer oder auch interaktiv mit dem Benutzer füllen können.
#!perl

use strict;
use warnings;
use Tk;

my $mw = MainWindow->new();

my $c1 = $mw->Canvas(
    -width  => '350',
    -height => '350',
)->pack();

$c1->createLine(
    25, 175, 325, 175,
    -arrow => 'last',
);
$c1->createText(
    15, 175,
    -fill  => 'blue',
    -text  => 'X',
);
$c1->createLine(
    175, 325, 175,  25,
    -arrow => 'last',
);
$c1->createText(
    175,  15,
    -fill  => 'red',
    -text => 'Y',
);

$mw->MainLoop();
So sieht das Ergebnis aus:
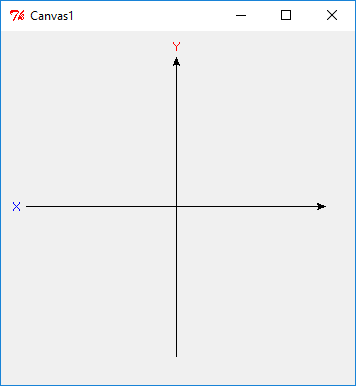
Hiermit erzeugen Sie auf dem Canvas-Fensterelement mit der Größe 350x350 ein
x/y-Koordinatenfeld.
Für Canvas-Widgets stehen einigen Funktionen zur Verfügung zum Zeichnen von
geometrischen Formen.
Diese beginnen meist mit create.
$c1->createLine(25, 175, 325, 175, -arrow => 'last');
bedeutet: der Anfangspunkt der Linie ist an Position x=25 und y=175 und der
Endpunkt an Position x=325 und y=175.
Mit arrow => last fügen wir einen Pfeil am Ende der Linie an.
Es wäre z.B. noch die Angabe für arrow möglich gewesen wie : arrow => first
am Anfang und arrow => both an beiden Seiten. Mit
$c1->createText(175, 15, -fill => 'red', -text => 'Y');erzeugen Sie einen Text an Position x=175 y=15 mit roter Farbe, ein 'Y'.
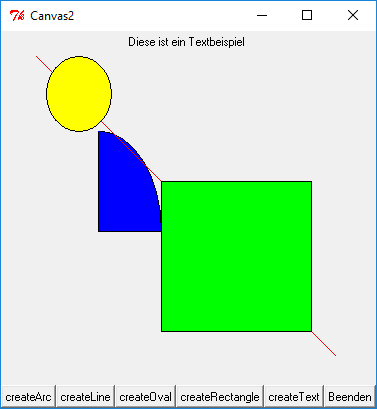
Es gibt viele geometrische Formen und Optionen wie am folgenden Beispiel zu sehen ist.
#!perl

use strict;
use warnings;
use Tk;

my $mw = MainWindow->new();

my $c1 = $mw->Canvas(
    -width  => '350',
    -height => '350',
)->pack();

my $schalter1 = $mw->Button(
    -text => "createArc",
    -command => sub{ arc(); },
)->pack(-side => 'left');

my $schalter2 = $mw->Button(
    -text => "createLine",
    -command => sub{ line(); },
)->pack(-side=> 'left');

my $schalter3 = $mw->Button(
    -text => "createOval",
    -command => sub{ oval(); },
)->pack(-side=> 'left');

my $schalter4 = $mw->Button(
    -text => "createRectangle",
    -command => sub{ rect(); },
)->pack(-side=> 'left');

my $schalter5 = $mw->Button(
    -text => "createText",
    -command => sub{ text(); },
)->pack(-side=> 'left');

my $schalter6 = $mw->Button(
    -text=>"Beenden",
    -command => sub{ $mw->destroy(); },
)->pack(-side => 'left');

$mw->MainLoop();

sub arc{
  $c1->createArc(25, 100, 150, 300, -fill => 'blue');
}

sub  line{
   $c1->createLine(25, 25, 325, 325, -fill => 'red');
}

sub oval{
  $c1->createOval(35, 25, 100,100, -fill => 'yellow');
}

sub rect{
  $c1->createRectangle(150, 150, 300, 300, -fill => 'green');
}

sub text{
   $c1->createText(175, 10, -text => 'Diese ist ein Textbeispiel');
}
So sieht das Ergebnis aus:
Mehr zum Fensterelement Canvas finden Sie auf der Widget-Seite zur Canvas.