(Es sollten eigentlich 20 werden, es wurden dann 5, aber das Prinzip ist das Gleiche ;).
#!perl

use strict;
use warnings;
use Tk;

my $mw = MainWindow->new;

my %results = (); # Eingaben werden heir abgelegt

foreach my $field (qw/Vorname Nachname Strasse PLZ Ort/) {
	$mw->Label(-text => $field)->pack();
	$mw->Entry(
		-textvariable => \$results{$field},
	)->pack();
}

$mw->Button(
	-text => "Ok",
	-command => sub { print "$_ => $results{$_}\n" for keys %results },
)->pack();
$mw->Button(-text => "Exit", -command => sub { exit } )->pack();

$mw->MainLoop();
exit(0);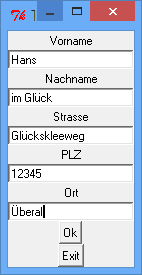
Ausgabe, wenn der OK-Button gedrückt wurde und alle Felder ausgefüllt waren:
Ort => Überall
PLZ => 12345
Strasse => Glückskleeweg
Vorname => Hans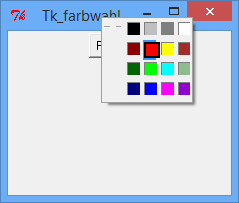
Nachname => im GlückUm eine Farbe in der GUI abzufragen gibt es bereits vorgefertigte Widgets wie Tk::chooseColor oder Tk::ColorEditor. Aber wer wissen will, wie man sich so einen Dialog auch selber machen kann, der kann sich nachfolgendes Beispiel ansehen:
#!perl
use strict;
use warnings;
use Tk;
my $mw = MainWindow->new;
my $palette;
my @colors = qw/Black red4 DarkGreen NavyBlue gray75 Red Green Blue
gray50 Yellow Cyan Magenta White Brown DarkSeaGreen DarkViolet/;
my $nom = native_optionmenu(
$mw,
\$palette,
[sub {print "args=@_.\n"}, 'First'],
@colors,
)->pack;
my $menu = $nom->cget(-menu);
my $topborder = 'gray50';
my $bottomborder = 'gray75';
foreach my $i (0 .. $#colors) {
# Create a 16 pixel x 16 pixel solid color swatch.
# Add a black ring around the currently selected item.
my $color = $menu->entrycget($i, -label);
my $p = $mw->Photo(qw/-width 16 -height 16/);
$p->put($topborder, qw/-to 0 0 16 1/);
$p->put($topborder, qw/-to 0 1 1 16/);
$p->put($bottomborder, qw/-to 1 15 16 16/);
$p->put($bottomborder, qw/-to 15 1 16 15/);
$p->put($color, qw/-to 1 1 15 15/);
my $r = $mw->Photo(qw/-width 16 -height 16/);
$r->put(qw/black -to 0 0 16 2/);
$r->put(qw/black -to 0 2 2 16/);
$r->put(qw/black -to 2 14 16 16/);
$r->put(qw/black -to 14 2 16 14/);
$r->put($color , qw/-to 2 2 14 14/);
$menu->entryconfigure($i, -columnbreak => 1) unless $i % 4;
$menu->entryconfigure($i,
-image => $p,
-hidemargin => 1,
-selectimage => $r,
);
}
$menu->configure(-tearoff => 1);
$menu->bind('<<MenuSelect>>' => sub {
my $label = undef;
my $w = $Tk::event->W;
Tk::catch {$label = $w->entrycget('active', -label)};
print "palette=$palette, menu label=$label!\n" if defined $label;
});
$mw->MainLoop;
sub native_optionmenu {
my($parent, $varref, $command, @optionvals) = @_;
$$varref = $optionvals[0];
my $mb = $parent->Menubutton(
-textvariable => $varref,
-indicatoron => 1,
-relief => 'raised',
-borderwidth => 2,
-highlightthickness => 2,
-anchor => 'c',
-direction => 'flush',
);
my $menu = $mb->Menu(-tearoff => 0);
$mb->configure(-menu => $menu);
my $callback = ref($command) =~ /CODE/ ? [$command] : $command;
foreach (@optionvals) {
$menu->radiobutton(
-label => $_,
-variable => $varref,
-command => [@$callback, $_],
);
}
$mb;
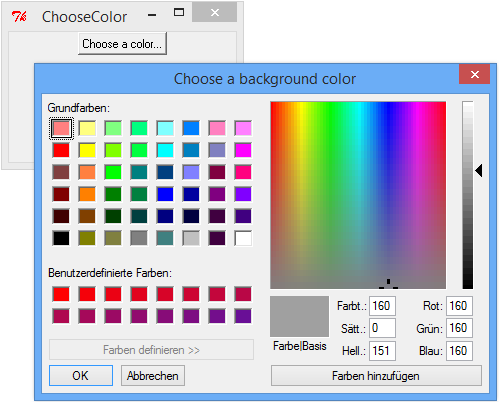
} # end native_optionmenuDer native Windows-Dialog, den man durch die Verwendung von Tk::chooseColor erhält, sieht übrigens so aus:
Das nachfolgende Programm gibt seinen Status auf der Standardausgabe aus, je nachdem, ob es gerade minimiert ist oder nicht.
#!perl

use strict;
use warnings;
use Tk;

my $mw = Tk::MainWindow->new(-title => 'Hello');
$mw->Label (-text => 'Hello, world!')->pack;

$mw->repeat (1000,
    sub { print ($mw->ismapped ? "Bin da!\n" : "Bin weg.\n") }
);

$mw->MainLoop;
exit(0);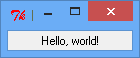
Die Ausgabe, wenn man das Fenster ab und zu mal minimiert, kann wie folgt aussehen:
Bin da!
Bin weg.
Bin weg.
Bin da!
Bin da!
Bin weg.
Bin weg.
Bin weg.
Bin weg.
Bin da!
Bin da!
Bin da!
Bin weg.
Bin weg.
Bin da!
Bin da!#!perl
use strict;
use warnings;
use Tk;
my $mw = Tk::MainWindow->new;
my %vars = (); # hier kommen die Feldwerte rein
foreach(qw/An: Von: Betreff:/) {
$mw->Label(-text => $_)->grid($mw->Entry(-textvariable => \$vars{$_}));
}
$mw->Button(
-text => 'send',
-command => sub { print "$_ ->> $vars{$_}\n" for keys %vars; }
)->grid();
$mw->MainLoop;
exit(0);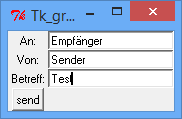
Von: ->> Sender
Betreff: ->> Test
An: ->> EmpfängerJede Zeile die restlos durch 3 teilbar ist wird farblich markiert.

#!perl

use strict;
use warnings;
use Tk;
use Tk::HList;
use Tk::ItemStyle;

my $mw = Tk::MainWindow->new;

my @tete = ('aaa'..'aaz');
my $zeile = 3;

my $hl = $mw->HList(-width => 50,)->pack(-fill => 'both', -expand => 1);
my $style = $hl->ItemStyle('text',
	-foreground => '#FF0000',
	-selectforeground => '#FF0000'
);

for (1..$#tete) {
    my $l = $hl->addchild('');
    $hl->itemCreate(
		$l,
		0,
		-itemtype => 'text',
		-style => ( $_ % $zeile) ? '' : $style,
		-text => $tete[$_ - 1],
	);
}

$mw->MainLoop;
exit(0);
#!perl

use strict;
use warnings;
use Tk;
use Tk::HList;

my $mw = Tk::MainWindow->new;

my $hlist = $mw->Scrolled("HList",
	-header => 1,
	-columns => 4,
	-scrollbars => 'osoe',
	-width => 70,
	-selectbackground => 'SeaGreen3',
)->pack(-expand => 1, -fill => 'both');

$hlist->header('create', 0, -text => 'From');
$hlist->header('create', 1, -text => 'Subject');
$hlist->header('create', 2, -text => 'Date');
$hlist->header('create', 3, -text => 'Size');

$hlist->add(0);
$hlist->itemCreate(0, 0, -text => "test\@email.de");
$hlist->itemCreate(0, 1, -text => "Re: HList?");
$hlist->itemCreate(0, 2, -text => "1999-11-20");
$hlist->itemCreate(0, 3, -text => "1432");

$hlist->add(1);
$hlist->itemCreate(1, 0, -text => "dummy\@foo.com");
$hlist->itemCreate(1, 1, -text => "Re: HList?");
$hlist->itemCreate(1, 2, -text => "1999-11-21");
$hlist->itemCreate(1, 3, -text => "2335");

$mw->MainLoop;
exit(0);In diesem Beispiel werden sortierende Buttons in der Titelleite der HList demonstriert.
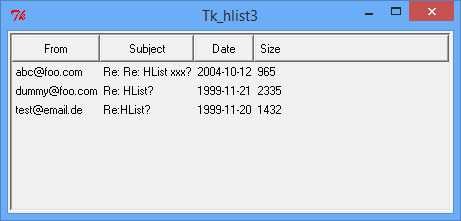
#!perl

use strict;
use warnings;
use Tk;
use Tk::HList;
use Tk::ItemStyle;

my $mw = Tk::MainWindow->new;

my $hlist = $mw->Scrolled("HList",
	-header           => 1,
	-columns          => 4,
	-scrollbars       => 'osoe',
	-width            => 70,
	-selectbackground => 'SeaGreen3',
)->pack();

my $headerstyle = $hlist->ItemStyle('window',
	-padx   => 0,
	-pady   => 0,
);

my $btn_from = $hlist->Button(-text => 'From',    -relief => 'flat', -command => [ \&MyTk::HList::order, 0, 0 ]);
my $btn_subj = $hlist->Button(-text => 'Subject', -relief => 'flat', -command => [ \&MyTk::HList::order, 1, 0 ]);
my $btn_date = $hlist->Button(-text => 'Date',    -relief => 'flat', -command => [ \&MyTk::HList::order, 2, 0 ]);
my $btn_size = $hlist->Button(-text => 'Size',    -relief => 'flat', -command => [ \&MyTk::HList::order, 3, 1 ]);

$hlist->header('create', 0, -itemtype => 'window', -widget => $btn_from, -style => $headerstyle);
$hlist->header('create', 1, -itemtype => 'window', -widget => $btn_subj, -style => $headerstyle);
$hlist->header('create', 2, -itemtype => 'window', -widget => $btn_date, -style => $headerstyle);
$hlist->header('create', 3, -itemtype => 'window', -widget => $btn_size, -style => $headerstyle);

my @mails = (
	['test@email.de',  'Re:HList?',       '1999-11-20', '1432'],
	["dummy\@foo.com", "Re: HList?",      "1999-11-21", "2335"],
	['abc@foo.com', 'Re: Re: HList xxx?', '2004-10-12',  '965'],
);

for my $index (0..$#mails) {
    $hlist->add($index);
    for my $textin (0..scalar(@{$mails[$index]}-1)) {
        $hlist->itemCreate(
			$index,
			$textin,
            -text => $mails[$index]->[$textin],
        );
    }
}

$mw->MainLoop;
exit(0);

# -----------------------------------------------------------------------------

package MyTk::HList;

my $last_btn;
my $switch;

BEGIN {
    $last_btn = -1;
    $switch   = 0;
}

sub order {
    my ($which, $numorder) = @_;

    $hlist->delete('all');

    my @sorted_mails = $numorder
                           ? sort{$a->[$which] <=> $b->[$which]} @mails
                           : sort{$a->[$which] cmp $b->[$which]} @mails;

    if ($which == $last_btn) {
        $switch       = 1 if $switch == 0;
        $switch       = -$switch;
        @sorted_mails = reverse @sorted_mails if $switch == -1;
    }
    else {
        $last_btn = $which;
        $switch   = 0;
    }

    for my $index(0..$#sorted_mails) {
        $hlist->add($index);
        for my $textin(0..scalar(@{$sorted_mails[$index]}-1)) {
            $hlist->itemCreate($index, $textin,
                               -text => $sorted_mails[$index]->[$textin],
                              );
        }
    }
} # /order

1; # /MyTk::HListDas Icon stamnmt aus der großartigen Open Icon Library.
![]()
#!perl

use strict;
use warnings;
use Tk;

my $mw = Tk::MainWindow->new(-height => 450, -width => 780);
my $main_icon = $mw->Photo( -file => 'bookmark-3.xpm', -format => 'xpm' );
$mw->Icon( -image => $main_icon );
$mw->title( 'test');


my $Label0 = $mw->Label(
	-text => "Suchen ...",
	-anchor => "nw"
);
$Label0->place( -x => 10, -y => 10, -height => 20, -width => 140);

$mw->MainLoop;
exit(0);Das Programm-Icon in der Titelleiste des Programms kann auch im Quellcode definiert werden.
![]()
#!perl

use strict;
use warnings;
use Tk;

my $mw = Tk::MainWindow->new(-height => 450, -width => 780);
my $main_icon = $mw->Photo( -file => 'bookmark-3.xpm', -format => 'xpm' );
$mw->Icon( -image => $main_icon );
$mw->title( 'test');


my $Label0 = $mw->Label(
	-text => "Suchen ...",
	-anchor => "nw"
);
$Label0->place( -x => 10, -y => 10, -height => 20, -width => 140);

$mw->MainLoop;
exit(0);
Ein leeres Tk-Fenster erscheint, die Ausgabe zu den gedrückten Tasten erscheint auf der Standardausgabe. Siehe auch: Anzeigen der gedrückten Taste für eine Anzeige der Taste in der GUI.
#!perl

use strict;
use warnings;
use Tk;

my $mw = Tk::MainWindow->new;

$mw->bind("<Key>", [ sub { print "Taste : '$_[1]'\n" }, Ev('K') ] );
# oder auch Ev('k') mit kleinem K

$mw->MainLoop;
exit(0);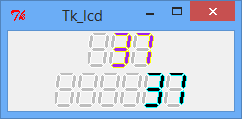
#!perl

use strict;
use warnings;
use Tk;
use Tk::LCD;

my $mw = Tk::MainWindow->new;

my $frog = 99 + 1;
my $lcd = $mw->LCD(
	-elements => 3,
	-onoutline => 'yellow',
	-onfill => 'purple',
	-variable => \$frog,
);
$lcd->pack;

my $lcd2 = $mw->LCD(-elements => 6);
$lcd2->pack;

while ($frog >= -9) {
    $mw->after(100);
    $frog--;
    $lcd2->set($frog);
    $mw->update;
}

$mw->MainLoop;
exit(0);Ein Beispiel zur Benutzung von gemeinsam gesteuerten Feldern. Es ist noch nicht perfekt, aber ein Anfang.
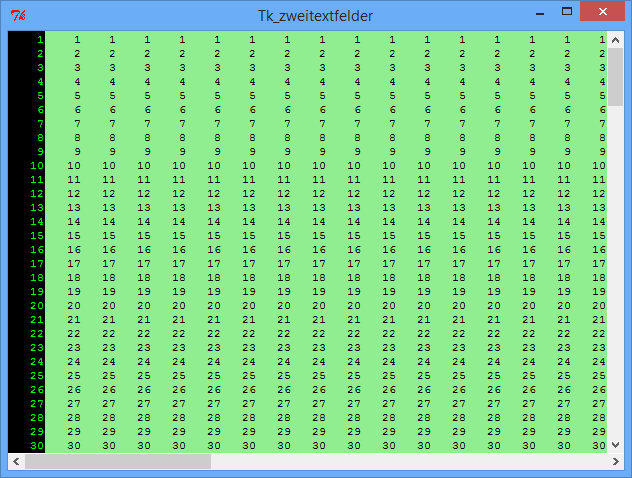
#!perl

use strict;
use warnings;
use Tk;

my $mw = Tk::MainWindow->new;

my $fr = $mw->Frame();

my $scrollx = $fr->Scrollbar( -orient => 'horizontal' );
my $scrolly = $fr->Scrollbar();

my $ltext = $fr->Text(
	-width            => 5,
	-height           => 30,
	-wrap             => 'none',
	-background       => 'black',
	-foreground       => 'green',
	-borderwidth      => 0,
	-selectbackground => 'white',
	-selectforeground => 'blue',
	-insertbackground => 'red',
);

my $rtext = $fr->Text(
	-width            => 80,
	-height           => 30,
	-wrap             => 'none',
	-xscrollcommand   => [ 'set' => $scrollx ],
	-yscrollcommand   => [ 'set' => $scrolly ],
	-background       => 'lightgreen',
	-foreground       => 'black',
	-selectbackground => 'black',
	-selectforeground => 'orange',
	-borderwidth      => 0,
);

$scrollx->configure( -command => [ 'xview' => $rtext ] );

# Den Scrollbalken so konfigurieren, dass er alle Listboxen scrollt:
$scrolly->configure(
	-command => sub {
		$ltext->yview(@_);
		$rtext->yview(@_);
	}
);

# Diese Methode wird aufgerufen, wenn eine der Textboxen mit der Tastatur
# gescrollt wird. Sie sorgt dafür, dass der Scrollbalken die Veränderung
# wiedergibt und die andere Textbox mitgescrollt werden.
sub scroll_textboxen {
	my ( $text, $textboxes, @args ) = @_;
	$scrolly->set(@args);    # Dem Scrollbalken mitteilen,
							 # was angezeigt wird
	my ( $top, $bottom ) = $text->yview();    # Ausschnitt des gescrollten
											  # Textfeldes auslesen
	for my $t (@$textboxes) {                 # Alle Textboxen auf diesen Aus-
		$t->yviewMoveto($top);                # schnitt setzen.
	}
}    # sub scroll_listboxes

$ltext->configure(
	-yscrollcommand => [ \&scroll_textboxen, $ltext, [ $ltext, $rtext ], ] );
$rtext->configure(
	-yscrollcommand => [ \&scroll_textboxen, $rtext, [ $ltext, $rtext ], ] );

$scrollx->pack(
	-side => 'bottom',
	-fill => 'x',
);
$scrolly->pack(
	-side => 'right',
	-fill => 'y',
);
$ltext->pack(
	-side => 'left',
	-fill => 'y',
);
$rtext->pack(
	-side   => 'left',
	-fill   => 'both',
	-expand => 1,
);

$fr->pack(
	-side   => 'left',
	-fill   => 'both',
	-expand => 1,
);

for ( 1 .. 200 ) {
	$_ = ' ' x ( 5 - length($_) ) . $_;
	$ltext->insert( 'end', "$_\n" );
	$rtext->insert( 'end', $_ x 50 . "\n" );
}
$ltext->insert( 'end', "  201" );
$rtext->insert( 'end', "  201" x 50 );

$ltext->focus();

$mw->MainLoop;
exit(0);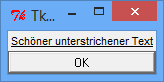
#!perl

use strict;
use warnings;
use utf8;
use Tk;

my $mw = MainWindow->new();
my $lb = $mw->Label(
	-font => '{Arial} 8 {underline}',
	-text => 'Schöner unterstrichener Text',
  )->pack(
	-expand => '1',
	-fill   => 'x',
	-side   => 'top',
  );
my $ok = $mw->Button(
	-text    => 'OK',
	-command => sub { $mw->destroy() },
	-default => 'active',
	-padx    => 15,
  )->pack(
	-expand => '1',
	-fill   => 'x',
	-side   => 'bottom',
  );

$mw->MainLoop;
exit(0);Ein Beispiel zur Benutzung von Bindungen an Hand von Buttons.
#!perl

use strict;
use warnings;
use Tk;

my $mw = Tk::MainWindow->new;

foreach my $text (qw/eins zwei drei/) {
    my $b = $mw->Button(-text    => "Button Nr. $text",
                        -command => sub { print "bzzzzzzzzz $text\n" },
                       )
                 ->pack(-fill => 'x');
    $b->bind('<ButtonPress>'   => [ \&printButtonLabel, $text, "gedrueckt" ] );
    $b->bind('<ButtonRelease>' => [ \&printButtonLabel, $text, "losgelassen" ] );
}

$mw->MainLoop;
exit(0);

sub printButtonLabel {
    my $widget     = shift;
    my $text       = shift;
    my $anhang     = shift;
    my $aufschrift = $widget->cget('-text');


    print "Button: $text (Aufschrift '$aufschrift') $anhang\n";
} # /printButtonLabel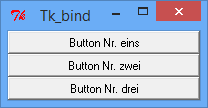
Button: eins (Aufschrift 'Button Nr. eins') gedrueckt
bzzzzzzzzz eins
Button: eins (Aufschrift 'Button Nr. eins') losgelassen
Button: zwei (Aufschrift 'Button Nr. zwei') gedrueckt
Button: zwei (Aufschrift 'Button Nr. zwei') losgelassen
Button: drei (Aufschrift 'Button Nr. drei') gedrueckt
bzzzzzzzzz drei
Button: drei (Aufschrift 'Button Nr. drei') losgelassen
Wie man sieht, verhalten sich die drei gebundenen Ereignisse unterschiedlich. Das per ButtonPress gebundene Event wird sofort aufgerufen, wenn auf den Button geklickt wird, das per ButtonRelease gebundene Event wird dann ausgeführt, wenn der Mausknopf losgelassen wird, unabhängig davon, wo sich der Cursor befindet. Der per -command angegebene Callback wird beim Loslassen der Maustaste ausgeführt, falls sich der Cursor noch über dem Button befindet.
So kann mit ButtonPress und ButtonRelease etwa eine "Drag and Paste" Funktionalität nachgebildet werden, was per -command nicht möglich ist. Dafür bietet letztere Möglichkeit die sichere Behandlung von "der Benutzer hat auf den Button gedrückt".
Weiteres zum Thema Bindungen erfährt man hier: Tk-Bindungen.
Siehe auch: Tk::Notebook - Beschreibung.
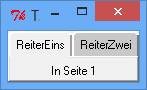
#!perl

use strict;
use warnings;
use Tk;
use Tk::NoteBook;

my $mw = Tk::MainWindow->new;

my $nb = $mw->NoteBook()->pack();

my $page1 = $nb->add('PageID-1', -label => 'ReiterEins');
my $page2 = $nb->add('PageID-2', -label => 'ReiterZwei');

$page1->Label(-text => 'In Seite 1')->pack();
$page2->Label(-text => 'In Seite 2')->pack();

$mw->MainLoop;
exit(0);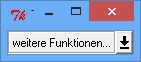
#!perl

# Modul Tk/ButtonPopup.pm:

package Tk::PopupButton;

use strict;
use warnings;

use Tk::Frame;
use Tk::Button;

our @ISA = qw/Tk::Frame/;

Construct Tk::Widget 'PopupButton';

sub Populate ($$) {
	my $w    = shift;
	my $args = shift;

	my $menu = delete $args->{-menu};

	my $m = $w->Menu(
		-tearoff   => 0,
		-menuitems => $menu,
	);

	$w->SUPER::Populate($args);

	my $b = $w->Button( -relief => 'groove', )->pack( -side => 'left', );
	my $ba =
	  $w->Button( -image => $w->Bitmap( -file => Tk->findINC('cbxarrow.xbm') ),
	  )->pack(
		-side => 'left',
		-fill => 'y',
	  );

	$ba->bind( '<ButtonPress-1>' => [ \&popup, $m ] );

	$w->ConfigSpecs( DEFAULT => [$b] );

}    # sub Populate

sub popup {
	my $w = shift;
	my $m = shift;

	$m->Popup(
		-popover   => "cursor",
		-popanchor => 's',
	);
}    # sub popup

1;   # /Tk::PopupButton

# Hauptprogramm:

package main;

use strict;
use warnings;
use Tk;

#use Tk::PopupButton; # anschalten, wenn Paket in Extradatei

my $mw = Tk::MainWindow->new;

my $menu = [
	[
		'command' => 'Funktion1',
		-command  => sub { print "Funktion1\n"; },
	],
	[
		'command' => 'Funktion2',
		-command  => sub { print "Funktion2\n"; },
	],
];

$mw->PopupButton(
	-text => 'weitere Funktionen...',
	-menu => $menu
)->pack();

$mw->MainLoop;
exit(0);
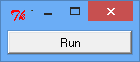
#!perl

use strict;
use warnings;
use Tk;

my $mw = Tk::MainWindow->new;

my $b = $mw->Button(-text => 'Run')->pack(-fill => 'x');

my $id;
my $i;

$b->bind('<ButtonPress-1>' => sub {
	$i = 0;
	$id = $mw->repeat(2, sub {print ++$i, "\n"});
});
$b->bind('<ButtonRelease-1>' => sub { $id->cancel() } );

$mw->MainLoop;
exit(0);
Ausgabe:
1
2
3
4
5
1
2
3
1
2
3
4
5
6
7
8
9
10
11
1
2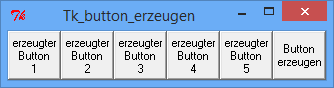
#!perl

use strict;
use warnings;
use Tk;

my $mw = Tk::MainWindow->new;

my $Count = 0;

$mw->Button(
	-text    => "Button\nerzeugen",
	-command => \&button_erzeugen,
)->pack(
	-side    => 'right',
	-expand  => 1,
	-fill    => 'both',
);

$mw->MainLoop;
exit(0);

sub button_erzeugen {
    ++$Count;
    $mw->Button(
		-text    => "erzeugter\nButton\n" . $Count,
    )->pack(
		-side    => 'left',
		-expand  => 1,
		-fill    => 'both',
    );
} # /button_erzeugenEin Beispiel für Autocomplete von Dateinamen in einem Editfenster (wie unter Linux in der bash oder unter Windows in der Konsole üblich).

#!perl

use strict;
use warnings;
use utf8;
use Tk;

my $mw = Tk::MainWindow->new;
$mw->title('Autovervollständigung');

my $e = $mw->Entry(-text    => '',
                   -width   => 80,
                  )
            ->pack(
                   -expand  => 1,
                   -fill    => 'x',
                  );

$mw->bind ('<Tab>', \&vervollstaendige );
$e->focus();

$mw->MainLoop;
exit(0);

sub vervollstaendige {
    my $text = $e->get();
    print $text, "\n";
    my @treffer;

    my ($pfad, $trenner, $anf) = $text =~ m~^(.*)([/\\])([^/\\]*)$~;
    print "pfad='$pfad', Anfang='$anf'\n";

    if (! -d $pfad) {
        print "'$pfad' ist kein Verzeichnis, Abbruch\n";
    }
    else {
        opendir PFAD, "$pfad/" or die "Kann Verzeichnis '$pfad' nicht öffnen: $!";
        my @verzeichnisse = grep -d "$pfad/$_", readdir PFAD;
        closedir PFAD;

        for my $v (@verzeichnisse) {
            print "Verzeichnis '$v'\n";
            if ($v =~ /^\Q$anf/i) { # bei Linux/Unix das i entfernen!
                print "Anfang '$anf' passt auf '$v'\n";
                push @treffer, $v;
            }
        }
    }

    $e->delete(0, 'end');

    if( scalar(@treffer) <= 1){
        $e->insert('end', "$pfad$trenner$treffer[0]");
    }else{
        $e->insert('end', "$pfad$trenner$anf");
    }

    $e->selectionClear();
    $e->icursor('end');

    #$e->configure(-state => 'disable');
    #$e->configure(-state => 'enable');
    $e->focus();
} # sub vervollstaendigeEin Beispiel zur Darstellung eines XTerms in einem Tk-Programm. Das geht nur, wenn XTerm auf dem System verfügbar ist.
#!perl
#
# This is just a simple demo of how to embed an xterm into a Tk application.
# This one puts it into a canvas, which opens the possibilities of using
# various backgrounds. I got the idea from a posting on the Tk::Zinc maillist
# by Christophe Mertz.
#
# von zentara (Perlmonks)
# "schön" gemacht von Crian
#
# Siehe thread http://www.perlmonks.org/index.pl?node_id=359764 .
#

use strict;
use warnings;
use Tk;

# Idea ripped from a script by Christophe Mertz of the
# Tk::Zinc module, to work with a plain canvas.
# The Zinc module has much more flexibility in how
# you can hide windows. I had to mask the xterm with a
# toplevel to hide it in the plain old canvas.

my $mw = Tk::MainWindow->new;

my $canv = $mw->Canvas(-bg     => 'lightsteelblue',
                       -relief => 'sunken',
                       -width  => 550,
                       -height => 350,
                      )
                ->pack(-expand => 1,
                       -fill   => 'both',
                      );

my $xtermWidth  = 400;
my $xtermHeight = 300;

## this Frame is needed for including the xterm in Tk::Canvas
my $xtermContainer = $canv->Frame(-container => 1);
my $xtid = $xtermContainer->id();
# converting the id from HEX to decimal as xterm requires a decimal Id
my ($xtId) = sprintf hex $xtid;

my $dcontitem = $canv->createWindow(275, 175,
                                    -window => $xtermContainer,
                                    -width  => $xtermWidth+100,
                                    -height => $xtermHeight,
                                    -state  => 'normal',
                                   );

my $label = $canv->createText(275, 10,
                              -text => "Hide xterm",
                             );

$canv->Tk::bind("<Button-1>", \&hide_show);

my $width  = $xtermWidth;
my $height = $xtermHeight;

$mw->Button(-text    => 'Exit',
            -command => [ sub{ Tk::exit } ],
           )
     ->pack();

my $tl;  #used to mask xterm
system("xterm -into $xtId &");

$mw->MainLoop;
exit(0);

# -----------------------------------------------------------------------------
sub hide_show {
    if ($canv->itemcget($label, -text) =~ /Hide/) {
             $canv->itemconfigure($label,
                    -fill => 'white',
                    -text => "Show xterm");

             $tl = $mw->Toplevel(-use=>$xtId );
           } else {
             $canv->itemconfigure($label,
                    -fill => 'black',
                    -text => "Hide xterm");
             $tl->withdraw;
        }
} # sub hide_show
# -----------------------------------------------------------------------------Leider funktioniert es nur unter Linux, nicht unter Windows. Eventuell interessant: das Tk::MDI (Multi Document Interface)-Widget.
#!/usr/bin/perl
use strict;
use warnings;
use Tk;

pipe(RDR,WTR);
if (fork == 0) {
   close WTR;
   chomp(my $id = scalar <RDR>);
   close RDR;
   my $mw2 = MainWindow->new(-use => $id);
   $mw2->Label(-text => "Das andere Fenster")->pack();
   MainLoop();
   CORE::exit();
}

close RDR;
my $mw = new MainWindow;
$mw->Label(-text => "Hier kommt das eingebettete Fenster:")->pack();
my $f  = $mw->Frame(-container => 1)->pack();
my $id = $f->id;
$mw->update; # wichtig, Fenster muss gemappt sein!
print WTR "$id\n";
close WTR;
MainLoop();